
A poorly lit display case can ruin years of collection in a matter of months. If your figures look flat, shadows hide details, or the heat from the lights is deforming the plastic, the problem is not your collection but the lighting. Learning to properly light display case figures makes the difference between an amateur showcase and a presentation that stops anyone passing by. This guide gives you the tools, technique, and criteria to do it right from the start.
Table of contents
- Key points
- Materials and prerequisites for lighting display cases
- Color temperature and intensity according to your figures
- Lighting installation and positioning techniques
- How to preserve your figures with good lighting
- Common mistakes and how to correct them
- My opinion on invisible light and preservation
- Enhance your display with quality accessories
- FAQ
Key points
| Point | Details |
|---|---|
| Choose LEDs with high CRI | A CRI of 90 or higher reproduces your figures' colors with true fidelity. |
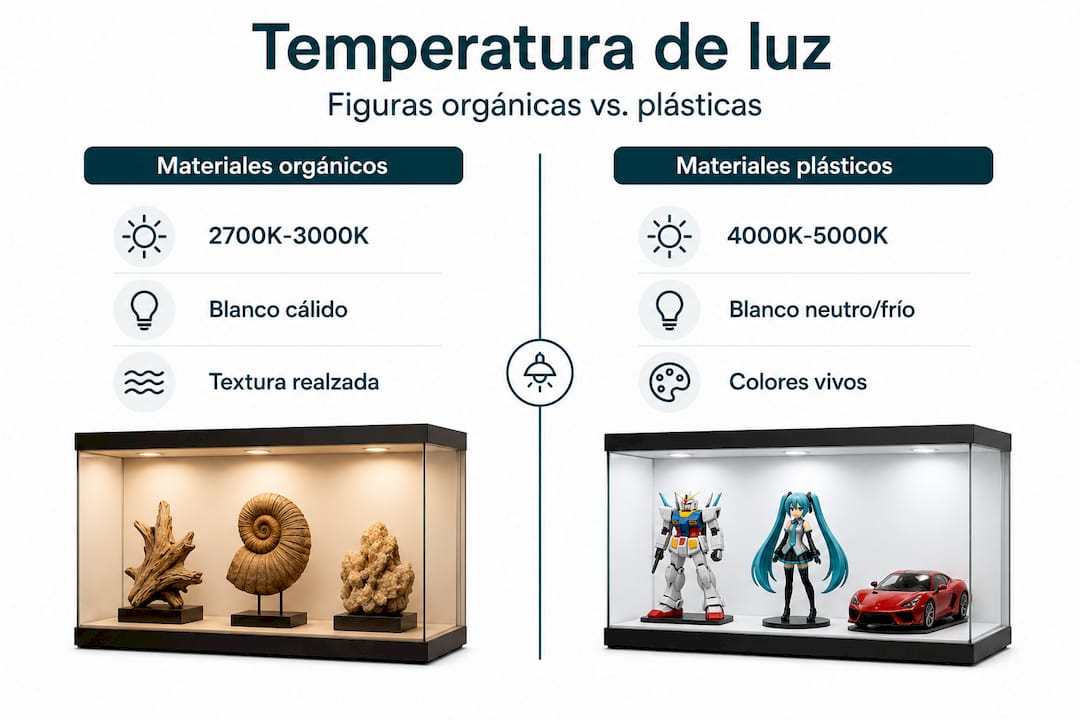
| Color temperature according to material | Use 2700K to 3000K for organic textures and 4000K to 6500K for anime or technology figures. |
| Install under the shelves | LED strips under each shelf create uniform light and eliminate unwanted shadows. |
| Protect with cool light | Cool LED sources prevent local heat and UV radiation that degrade paints and plastics. |
| Plan before installing | Measuring shelf depth and height before placing lights avoids problems that are difficult to fix. |
Materials and prerequisites for lighting display cases
Before buying any LED strip, you need to be clear about what type of display case you have and what figures you will showcase. It's not the same to light a 30 cm deep display case with 20 cm anime figures as an open shelf with large-format dioramas.
Recommended types of LED lights
SMD2835 type LED strips are the most recommended for collector display cases. They offer high light density, low profile, and stable temperature. For proper display case lighting, always look for models with a CRI above 90, as below this value the colors of the figures visibly distort. Modern LED luminaires also have a lifespan of 40,000 hours and consume up to 90% less than traditional halogens, making them the most efficient option for continuous use.
Necessary tools and accessories
For a proper installation you need:
- LED strips with 3M adhesive or aluminum channels with diffuser
- Compatible voltage controller (12V or 24V depending on the strip)
- Measuring tape and bubble level
- Solderless connectors for clean joints
- Polycarbonate diffusers to soften the light line
Aluminum channels with diffusers are especially useful because they turn a line of light points into a continuous and soft source. This eliminates “hotspots” or bright spots that distort the perception of the figures.
Measurement and prior planning
Planning the depth and height of each shelf before installation is essential. A standard depth of 30 cm allows placing the strips on the front edge of the top shelf to illuminate the lower level without the light source being visible to the viewer. If you install first and measure later, correcting the position of the channels is complicated and can damage the inside of the display case.

Professional tip: Before fixing any LED strip, simulate the position with painter’s tape and turn on a flashlight from that angle. You will see exactly what shadows are generated and can adjust before committing to the final installation.
Color temperature and intensity according to your figures
Color temperature is probably the most important decision you will make when lighting decorative figures. A mistake here is not easily corrected once the system is installed.
Temperature guide by collection type
| Type of figure | Recommended temperature | Visual effect |
|---|---|---|
| Wood, ceramic, or resin figures with organic textures | 2700K to 3000K | Warmth, depth in textures |
| Anime, video game, or glossy plastic figures | 4000K to 5000K | Vivid colors, sharp finishes |
| Metallic figures or with chrome effects | 5000K to 6500K | Defined highlights, technical look |
| Mixed dioramas with multiple materials | 3500K to 4000K | Neutral balance between warmth and coolness |
As the color temperature guide indicates, warm white between 2700K and 3000K favors organic textures, while neutral to cool white between 4000K and 6500K enhances anime and technology figures.
The role of CRI in color fidelity
A CRI of 90 is not a technical whim. It is the difference between seeing the exact red of a character's cape or seeing it as a dull orange. For collections with detailed paintings or special editions with metallic finishes, consider LEDs with a CRI of 95 or higher. Most generic low-cost strips have a CRI between 70 and 80, which noticeably distorts the original colors of the figures.
To avoid saturation or glare, keep the light intensity between 200 and 400 lux inside the display case. Above 500 lux, figures with shiny finishes produce annoying reflections that reduce the visual readability of details.
Lighting installation and positioning techniques
The positioning of the lights determines whether your display case looks like a museum shop or a lit refrigerator. There are four main techniques you can combine depending on the result you want.
-
Under-shelf lighting. LED strips under each shelf create uniform light on the lower level, eliminate shadows, and can be combined with diffusers for a continuous light line without visible points. It is the most versatile technique and the most recommended for dense collections.
-
Backlighting or backlight. Placing an LED strip at the back of the display case, pointing towards the background, creates a halo or floating effect around the figures. It works especially well with dark backgrounds or colored panels. The contrast between the lit background and the figure in the foreground adds depth without needing more light power.
-
Side or edge lighting. Installing strips on the sides of the display case, at mid-height, creates soft shadows that shape the volume of the figures. This technique is ideal for sculptures or figures with a lot of relief, as grazing light highlights every three-dimensional detail.
-
Spot overhead lighting. For single figures or standout pieces, a small adjustable LED spotlight installed at the top of the display case creates a spotlight effect similar to museums. Combine it with backlighting to prevent the figure from being surrounded by darkness.
As the principle of designing with light points out, the quality and placement of light sources matter more than the quantity. Adding more lights without planning flattens volumes instead of highlighting them.
Professional tip: Always hide the light source from the viewer. If from the normal viewing angle you can see the LED strip directly, the visual effect is broken and the eye is distracted from the figures. Use channels with diffusers or place the strips recessed behind the edge of the shelf.
The invisible source is the professional standard: light should be perceived as a support that highlights texture and volume without dazzling or distracting.
How to preserve your figures with good lighting
Incorrect lighting not only ruins aesthetics. It can physically deteriorate your collection in less time than you imagine.
The greatest risk for plastic, resin, and vinyl figures is localized heat. Halogen or incandescent lights generate surface temperatures that can deform soft plastics within weeks. Cool LEDs eliminate this risk because cool LED light and hidden guides prevent damage to pigments and structural deformation.
Ultraviolet radiation is the second enemy. Although LEDs emit very low levels of UV compared to sunlight or fluorescents, if your showcase is near a window, the combination can accelerate the yellowing of white plastics and the fading of paints. Consider adding a UV filter to the showcase glass if sun exposure is frequent.
For long-term preservation, apply these practices:
- Always use LEDs with an operating temperature below 45°C on the strip surface
- Install diffusers between the strip and the figures to distribute residual heat
- Check the condition of the strips every six months and clean the dust accumulated in the channels
- Take advantage of reflective interior surfaces to increase brightness by up to 80% without adding more power, thus reducing the total heat generated
Precise and cool light in showcases not only protects delicate objects but also enhances the viewer's experience by focusing attention on the figure, not the lighting fixture. — Precise lighting in museum showcases
Common mistakes and how to correct them
Knowing the most common mistakes saves you time, money, and frustration. According to usual installation patterns, these are the most repeated errors:
- Insufficient lighting on the lower levels. The lowest level of the showcase always receives less light. Solution: install an additional strip under the second shelf from the bottom or use a strip with higher light density in that position.
- Overfront lighting. Too much direct light flattens the figures and removes the shadows that create volume. Reduce the power or add a more opaque diffuser.
- Harsh shadows between figures. This happens when figures are tall and block light to the pieces behind. Backlighting or a second side source solves this problem easily.
- Incorrect color temperature for the material. A hand-painted resin figure under 6500K light looks like an industrial plastic piece. Always check the temperature before fixing the installation.
- Visible and messy wiring. Besides being unaesthetic, exposed wiring can catch on the figures during handling. Use adhesive channels the same color as the inside of the display case to hide it.
- Not planning the total voltage. If you connect several strips in series without calculating the total load, the controller can overheat or the strips at the end may be dimmer. Always calculate the total power before buying the transformer.
My opinion on invisible light and preservation
I’ve seen extraordinary collections completely ruined by a cheap LED strip stuck to the top of the display case. And I’ve seen modest collections that looked like museum pieces thanks to carefully thought-out lighting.
What has been hardest for me to understand, and hardest to explain to other collectors, is that the best light is not more light. It’s light that is not seen. When you enter a well-lit display case and your eye goes directly to the figures without noticing where the light is coming from, that is artistic lighting for figures done right.
In my experience with collections of different materials, the most costly mistakes are not technical. They are aesthetic. Choosing 6500K for a hand-painted resin figure, or placing white backlighting behind figures with white bases, are decisions no technical tutorial will warn you about strongly enough.
My advice for beginners: start with a single 4000K LED strip with CRI 95 under the top shelf. Observe the result for a week before adding more elements. The temptation to add lights everywhere is real, but each additional source that isn’t planned adds problems, not solutions.
For advanced collectors: experiment with colored backlighting. An RGB strip on the back of the display case, set to a very soft tone that complements your collection's color palette, completely transforms the perception of the set without touching the figures.
— Marina
Enhance your display with quality accessories
If you already have the lighting clear, the next step is to make sure the rest of your display is up to the same standard. Good lighting on a mediocre presentation base is still a mediocre presentation.
Reimii designs and manufactures 3D accessories for collectors that combine functionality and aesthetics: bases, organizers, and stands designed so your figures occupy exactly the place they deserve inside the display case. If you collect role-playing game figures, the Reimii gaming collection includes specific solutions to present your pieces with the level of detail they require. And if you also organize collectible cards alongside your figures, Reimii's TCG accessories allow you to integrate both collections in the same space with visual coherence. Explore the entire catalog at Reimii and find the perfect complement for your display case.
FAQ
What color temperature is best for anime figures?
For anime figures and glossy plastic, the ideal temperature is between 4000K and 5000K. This range highlights vivid colors and sharp finishes without distorting the original tones.
What CRI do I need to light collectible figures?
Always use LEDs with a CRI of 90 or higher. Below that value, the colors of the figures are distorted and metallic or painted finishes lose visual fidelity.
Do LED lights damage plastic or resin figures?
Cool LEDs do not generate significant heat and emit very low levels of UV, so they are safe for plastic, resin, and vinyl. Avoid halogen and incandescent lights, which can deform sensitive materials over time.
Where is the best place to put LED strips in a display case?
The most effective position is under each shelf, pointing towards the lower level. Combined with diffusers, it creates uniform light without visible bright spots and eliminates shadows between figures.
How much light does a figure display case need?
Between 200 and 400 lux inside the display case is enough for an optimal presentation. Above 500 lux, figures with glossy finishes create reflections that make it difficult to see the details.
0 comments